
The proxy ecosystem has a large number of useful utilities that make the use of overseas proxy IP proxy settings simple. One type of tool is called a proxy management tool, and FoxyProxy is a popular one in this tool set.
This article will comprehensively analyze the functions and features of the FoxyProxy extension, how to download Foxyproxy, and how to use the FoxyProxy plug-in to manage overseas dynamic IP proxies in Google Chrome and Firefox.


What does the FoxyProxy plugin do?
FoxyProxy is an advanced overseas dynamic IP proxy management tool that can be used as an extension for Google Chrome, Mozilla Firefox, Microsoft Edge, and other Chromium-based browsers. It is widely used by developers, IT professionals, and individuals who use proxies for privacy protection. It simplifies the management and switching tasks between multiple proxies and is a very convenient tool.
Is FoxyProxy plugin safe to use?
Of course. You can find more useful information about the team behind FoxyProxy on the FoxyProxy website. In addition, there are many reviews online that can help us understand its security. The conclusions drawn after market research are often more reliable.
What are the advantages of FoxyProxy plugin?
1. Pattern-based proxy switching: This feature allows you to define patterns for the URLs you visit. After that, different proxies can be assigned to different patterns. So, when you visit a URL, it automatically routes the traffic through the appropriate proxy based on your predefined pattern.
2. Multi-Proxy Support: It supports multiple proxies and allows you to switch between them easily. You can add, remove, enable or disable proxies with just a few clicks.
3. Color Coding: To help quickly identify different agents and modes, it uses color coding. You can assign different colors to different agents or modes for easy identification.
4. Import and export settings: This feature allows importing and exporting settings. It is especially useful when you need to use the same configuration on multiple devices or share settings with other people.
5. Logging: It provides detailed logs of all agent activities. This feature is beneficial for debugging and tracing purposes.
6. Proxy Auto-Config (PAC) file: It can generate a PAC file based on the current proxy settings, allowing you to use the same settings on different browsers or devices.
How to use FoxyProxy plugin on Google Chrome?
The way to get started with FoxyProxy is to install the extension on your browser, after which you can start adding proxies and defining modes. Here is a step-by-step guide on how to set it up:
Step 1 : Download and install the extension.
First go to the Google Play Store and search for FoxyProxy. Click the “Add to Browser” button to install the extension.

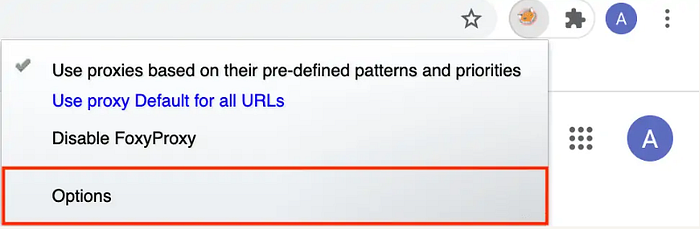
Once installed, click on the small icon in the upper right menu and then click on Options. This will open a new window.
Step 2 : Add a proxy. In the Proxies tab, click Add New Proxy. This menu may look a little scary if you are not used to manual configuration, but don't worry, because it is very simple to use.
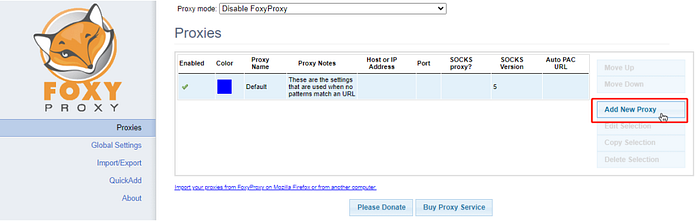
Here you need to enter the details of the proxy server including the IP address and port number. You can also assign your favorite color to this proxy for easy identification.
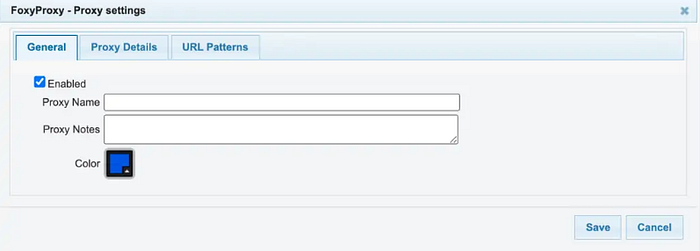
Step 3 : From the Proxy Details tab, select Manual proxy configuration and enter the proxy server information.
If you are on a managed school or work network, the automatic proxy configuration URL comes in handy. It configures the proxy server without you having to do anything.

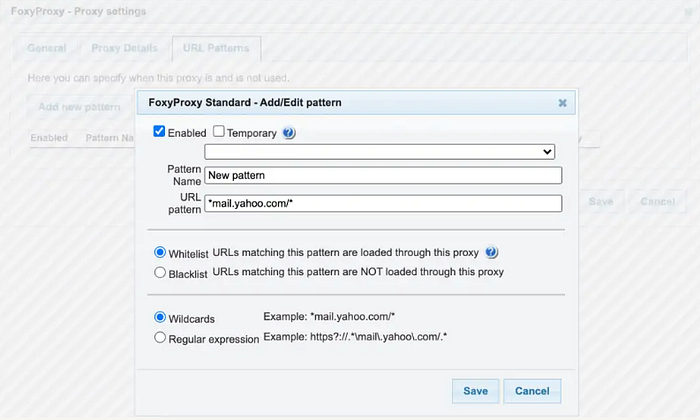
Step 4 : Define Patterns. Now navigate to the URL Patterns tab and click on Add New Pattern. In this section, you can define the pattern of URLs that you want to route through a specific proxy. You can also select the proxy you want to use for this pattern.
Select whether to whitelist or blacklist the URL you just entered. Blacklisted URLs take precedence over whitelisted URLs.
Step 5 : Enable your proxy profile. Click on the extension icon and select: If you want to enable proxy 'profile name' for all websites, Use proxy 'profile name' for all URLs.
If you have configured proxies to work on specific websites, use the proxies according to the predefined pattern and priority.

Step 6 : Test the proxy. Now you can check if your location and IP address have changed.
Now you have successfully set up the FoxyProxy plugin on your Google Chrome!
This article comes from online submissions and does not represent the analysis of kookeey. If you have any questions, please contact us